How to Make a Fursuit Head
Fursuits, wearable costumes designed to resemble animal characters, have gained immense popularity over the past few years, particularly in the furry community. One of the most essential components of a fursuit is the head, responsible for portraying the character’s personality and expressions. In this article, we’ll guide you through creating your very own fursuit head.
Step 1: Gather Materials and Tools
To make a fursuit head, you’ll need the following materials and tools:
– Foam (upholstery foam or EVA foam)
– Faux fur fabric
– Scissors
– Hot glue gun and glue sticks
– Sewing machine or needle and thread
– Marker
– Measuring tape
– Reference images of your character
– Balaclava or other snug-fitting headwear
Step 2: Taking Measurements
Take accurate measurements of your head, including circumference, distance between eyes, nose length, and mouth width. Use these measurements to help guide your construction.
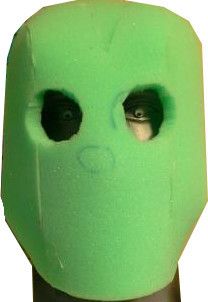
Step 3: Crafting the Base
Start by covering your balaclava with foam to create a base for your fursuit head. Cut out foam shapes for each section of the face – forehead, cheeks, muzzle, and chin – and attach them with hot glue. It’s essential to leave enough space for ventilation. Your face should fit comfortably inside without feeling constricted.
Step 4: Adding Features and Expression
Once you’ve built the base, it’s time to add features like ears, eyes, nose, and mouth that give life to your character. Using reference images, cut out foam shapes for each feature and glue them onto the base. Be creative with expressions! Subtle adjustments can change an expression from happy to mischievous; experiment until you’re satisfied with the result.
Step 5: Creating the Fur Pattern
Lay the faux fur fabric on a flat surface and place your fursuit head on top, fur side down. Trace the foam base’s outline onto the fabric with a marker, making sure to add seam allowances. Repeat for each part of the face until you have a complete pattern. Remember to mark where seams will connect.
Step 6: Cutting and Sewing the Fur
Using scissors, carefully cut out your marked patterns from the fur fabric. Next, sew each piece together along their respective seams either by hand or with a sewing machine, leaving openings to accommodate features such as eyes or mouth.
Step 7: Attaching the Fur to the Base
Once all pieces are sewn, put the entire fur covering over the foam head base like a glove. Adjust until it fits snugly and aligns with all facial features and glue it down using hot glue. Be patient and precise, working in small sections to avoid noticeable seams.
Step 8: Final Touches
With your fursuit head fully covered, add any final touches such as whiskers, additional fur layers, or airbrushing for extra depth and texture. Make use of additional fabric or other materials to bring your character to life.
And there you have it! With patience, creativity, and dedication, you can create a unique fursuit head that brings your character to life. Don’t be afraid to experiment with different materials and techniques; no two fursuit heads are exactly alike. Good luck on your fursuit-making adventure!