How to Remove a Child From Family Sharing
Family sharing is an excellent feature of Apple devices that allow a family to share purchases and subscriptions with each other. With family sharing, a family can save money and have access to different Apple services simultaneously. However, there might be instances when a family member is no longer interested in participating in the family sharing, or you want to remove them from the group.
In this article, we’ll provide a comprehensive guide on how to remove a child from family sharing.
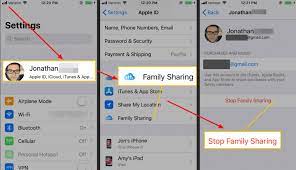
Step 1: Open Your Settings App
The first step is to open your settings app on your Apple device. Ensure that your device is running on iOS 8 or later version.
Step 2: Tap on “Your Name”
Once you’re in the settings app, scroll down to the “Apple ID” section and tap on “Your Name.”
Step 3: Tap on “Family Sharing”
In the next screen, you’ll see various options related to your Apple account. Tap on “Family Sharing.”
Step 4: Tap on “Your Child’s Name”
You’ll see a list of family members in the family sharing group. Tap on your child’s name that you want to remove from the family sharing.
Step 5: Tap on “Remove”
In the next screen, tap on “Remove” and then confirm that you want to remove your child from family sharing.
Note: If the child has an active subscription or is a part of any shared purchases, you’ll be prompted to remove them from the subscription or the shared purchase. You need to proceed with the prompt to complete the removal process.
Conclusion
Family sharing is an exceptional feature for managing shared purchases and subscriptions of family members. However, sometimes a child might want to opt-out or the parent wants to remove the child. By following this guide, you can easily remove a child from family sharing without any hassle. We hope this article helps you in removing a child from family sharing.