How to Melt Wax for Candles
Candle making is a rewarding and creative hobby that has gained popularity in recent years. Melted wax is the essential ingredient needed to make candles, and knowing how to melt wax properly is crucial for candle-making success. In this article, we will guide you through the process of melting wax for candles, step by step.
1. Choose the Right Type of Wax
There are various types of wax available, such as beeswax, soy wax, paraffin wax, and palm wax. Each type has its unique properties and will affect the quality, appearance, and burning time of your finished candle. Consider your preferences and needs before selecting a type of wax.
2. Gather Necessary Equipment
To melt wax for candles, you will need:
– A double boiler or a heat-safe container and a pot large enough to hold it
– A cooking thermometer
– A spatula or spoon
– Protective gloves
– Your chosen candle wax
3. Prepare the Workspace
Ensure that your workspace is clean and free of clutter to prevent accidents. Also, protect any surfaces from spills with newspaper or disposable tablecloth.
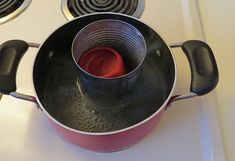
4. Use a Double Boiler
Melting wax requires even heat distribution to avoid burning the wax or causing unwanted flaws in your candles. To achieve this result, use a double boiler or create one by placing a heat-safe container inside a larger pot filled with water.
5. Measure Your Wax
Measure the amount of wax needed for your candles using a scale or by estimating the volume based on your chosen candle mold or container size. When starting out, it’s always better to have more wax than needed.
6. Heat the Wax
Fill the bottom part of your double boiler with water and place it on medium-low heat until it begins to simmer before reducing it to low heat. Add your measured wax into the top section of the double boiler.
7. Monitor the Wax’s Temperature
Place a cooking thermometer into the melting wax. The ideal temperature will vary depending on your chosen wax type. Paraffin generally melts at around 120-150°F (49-65°C), soy wax at 170-180°F (76-82°C), and beeswax at 145-150°F (63-65°C). Keep checking the temperature regularly to avoid overheating.
8. Stir Gently but Frequently
As the wax begins to melt, gently stir it with a spatula or spoon to ensure even melting and prevent sticking to the container’s bottom. Continue stirring until the wax is completely melted and has reached its melting point.
9. Add Fragrance and Color (optional)
Once the wax has reached its recommend melting point, you can add fragrance oils and colorants if desired. Check the specific instructions for each product to determine appropriate amounts and when to incorporate them into your wax.
10. Let the Wax Cool Slightly
After adding any additives, turn off the heat, allowing the wax to cool slightly before pouring it into your candle molds or containers. It’s best for paraffin wax to cool to approximately 10°F (6°C) below its melting point, soy and beeswax-about 5°F (3°C) below.
11. Pour Your Candles
Carefully pour your melted wax into your prepared candle molds or containers while wearing protective gloves. Allow them to cool and harden before trimming any excess wick and enjoying your handcrafted candles.
With these simple steps, you’ll be well on your way to creating beautiful candles for personal use or gifts for loved ones. Explore different waxes, scents, colors, and molds to create unique candle combinations that suit your style and preferences.