How to Make Skeleton Leaves

Introduction
Skeleton leaves are unique and captivating natural ornaments that can be used in a variety of craft projects, home decor, and even as jewelry. They come in a range of shapes, sizes, and colors, making them incredibly versatile accents in any creative endeavor. In this article, we will guide you through the process of making your very own skeleton leaves from fresh leaves.
Materials Needed
1. Fresh leaves – Choose leaves with a sturdy structure and distinct veins. Good examples are maple, oak, or rose leaves.
2. Washing soda
3. Water
4. A shallow dish or tray
5. A soft brush (such as a paint brush or toothbrush)
6. Paper towels or soft cloth
7. Tweezers
Step-By-Step Process
Step 1: Select Your Leaves
Look for healthy fresh leaves with no damage or decay. The best time to collect leaves is in the spring or summer when they are at their peak of growth.
Step 2: Prepare the Washing Soda Solution
In a shallow dish or tray, mix approximately 2 tablespoons of washing soda with 1 cup of water. Stir it well until the washing soda is dissolved.
Step 3: Soak the Leaves
Place your chosen leaves into the washing soda solution, ensuring that they are fully submerged in the liquid. It is important to arrange them in a single layer to prevent them from sticking together.
Step 4: Let them Soak
Allow your leaves to soak in the washing soda solution for an extended period of time between 5 days and 2 weeks based on their thickness and the stubbornness of the flesh. Be sure to keep an eye on them and ensure they remain submerged during this time.
Step 5: Remove Flesh from Leaves
Once the flesh of the leaves has become soft and translucent, it is time to remove them from the solution. Use a pair of tweezers to gently lift each leaf out of the liquid and place it onto a paper towel or soft cloth.
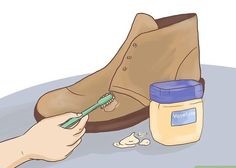
Step 6: Clean off remaining flesh
Using a soft brush (like a paintbrush or toothbrush), gently scrape away any remaining flesh from the surface of the leave, exposing the delicate veins. Be careful not to apply too much pressure, as you may accidentally tear the leaf during this process.
Step 7: Rinse and Dry
Once the flesh has been removed and only the skeleton remains, rinse each leaf well under running water to remove any residual washing soda. Then, pat them dry with paper towels or a soft cloth, being careful not to damage their delicate structure.
Step 8: Final Touches
Skeleton leaves can now be used in various crafting projects such as scrapbooking, card making, jewelry designing or framed as unique wall art. You can further customize your skeleton leaves by adding color using watercolor paint or other coloring techniques.
Conclusion
Creating skeleton leaves is a rewarding and engaging craft project that results in beautiful natural accents for any creative endeavor. With some patience and careful attention to detail, you can make intricate and delicate pieces to enhance your home or give as thoughtful gifts. Now all that’s left is to marvel at nature’s artistic masterpiece – your very own skeleton leaves!